
概要
QUICでクライアントからサーバへデータ報告するプログラムを作成した.機能としては
- サーバ…クライアントからデータを待ち受け,受信したらレスポンスを返す
- クライアント…データを2秒おきにサーバへ送信する.コネクションがタイムアウトした場合は再度接続しなおす.
とした.
クライアントが送るデータは適当に用意したURLからHTTP GETでとってくるものとした.
目次
- QUICについて
- コード
- 実行結果
本題
QUICについて
QUIC(Quick UDP Internet Connections)は、Googleが開発したプロトコルであって,インターネットで広く利用されているTCPにとって代わるものとして設計されている.
信頼性の低いUDP上に構築されているが,TLS/SSL暗号化や輻輳,再送制御などを実現している.
pythonではQUIC用のモジュールとしてaioquicがある.
TCPをQUICで代替するプロトコルの例
- HTTP over QUIC (HTTP/3)
- SSH over QUIC
- MQTT over QUIC
UDPをQUICで代替するプロトコルの例
コード
サーバ側のコード
# server.py
import asyncio
from aioquic.asyncio import serve
from aioquic.quic.configuration import QuicConfiguration
from aioquic.asyncio.protocol import QuicConnectionProtocol
from aioquic.quic.events import QuicEvent, StreamDataReceived, ConnectionTerminated

import json

def decodeDictAsJson(data: bytes) -> dict:
    return json.loads(data.decode('utf-8'))

class ServerSideQuicProtocol(QuicConnectionProtocol):
    def __init__(self, *args, **kwargs):
        super().__init__(*args, **kwargs)
        self.quic = None

    def quic_event_received(self, event:QuicEvent) -> None:
        if isinstance(event, StreamDataReceived):
            data = decodeDictAsJson(event.data)

            print(f"value is {data['value']}")

            # 通常の応答処理
            response = f"Server received: {data}".encode()
            self._quic.send_stream_data(event.stream_id, response, end_stream=False)
        elif isinstance(event, ConnectionTerminated):
            print(f"Connection terminated. Code:{event.error_code} Reason: {event.reason_phrase}")

async def run_server(host, port):
    configuration = QuicConfiguration(is_client=False)
    configuration.idle_timeout=30.0
    configuration.load_cert_chain("./cert/ssl_cert.pem", "./cert/ssl_key.pem")

    await serve(host,
                port,
                configuration=configuration,
                create_protocol=ServerSideQuicProtocol)

async def main():
    print("Server is starting...")
    await run_server('localhost', 4433)
    await asyncio.Future()  # サーバーを永続的に実行

if __name__ == "__main__":
    asyncio.run(main())
クライアント側のコード
import asyncio
from aioquic.asyncio import connect
from aioquic.quic.configuration import QuicConfiguration
from aioquic.asyncio.protocol import QuicConnectionProtocol
from aioquic.quic.events import QuicEvent, StreamDataReceived, ConnectionTerminated

import urllib.request

import json

url = "http://localhost:8000"

class MyClientProtocol(QuicConnectionProtocol):
    def __init__(self, *args, **kwargs):
        super().__init__(*args, **kwargs)
        self.messages = []
        self.stream_id = None
        self.reconnect_attempts = 0

    async def send_json(self, data:dict):
        if self.stream_id is None:
            self.stream_id = self._quic.get_next_available_stream_id()
        json_data = json.dumps(data).encode('utf-8')
        self._quic.send_stream_data(self.stream_id,json_data, end_stream=False)
        self.transmit()

    def quic_event_received(self, event):
        if isinstance(event, StreamDataReceived):
            message = event.data.decode()
            print(f"Received: {message}")
        if isinstance(event, ConnectionTerminated):
            print(f"Connection terminated: {event.error_code} - {event.reason_phrase}")
            self._connected = False


async def connection_start():
    configuration = QuicConfiguration(is_client=True,idle_timeout=10.0)
    configuration.verify_mode = False  # 開発環境用。本番環境では適切に設定すること
    req = urllib.request.Request(url)
    randomReadValue = 0
    try:
        while True:
            async with connect(
                "localhost",
                4433,
                configuration=configuration,
                create_protocol=MyClientProtocol
            ) as client:
                while client._connected:
                    with urllib.request.urlopen(req) as res:
                        randomReadValue = json.loads(res.read().decode('utf-8'))
                        randomReadValue["id"] = client._quic.host_cid.hex()
                        print(randomReadValue)
                    await client.send_json(randomReadValue)

                    await asyncio.sleep(2)
                client.close()
                await client.wait_closed()

    except Exception as e:
        print(f"Connection failed: {e}")


async def run_client():
    await connection_start()

if __name__ == "__main__":
    asyncio.run(run_client())
Webサーバのコード
from fastapi import FastAPI
import random
app = FastAPI()

@app.get("/")
async def show_random():
    value = random.random()
    print(value)
    return {"value":value}
サーバーサイドコード概要
connection_start関数内のserve(...)でサーバープロセスを開始.- バインドするIPアドレス(
host),リッスンポート(port),暗号化キーやタイムアウト時間などの設定(configuration),各種処理(create_protocol)*1をそれぞれ引数で指定. QuicConnectionProtocolを継承するクラスを定義して,その中に処理を書いておく.create_protocolの引数に上記のクラスを指定する.
- バインドするIPアドレス(
- メインは
quic_event_received関数のif isinstance(event, StreamDataReceived):以下.
受け取ったjsonをデシリアライズして,クライアントへ受信メッセージを返すだけ.
クライアントサイドコード概要
connection_start関数内のconnect(...)でサーバーへのコネクションを開始.- サーバーIPアドレス,ポート,設定,各種処理を
connect()の引数で指定する.
こちらもサーバーサイドと同様にcreate_protocolが使える.
- サーバーIPアドレス,ポート,設定,各種処理を
- メインの処理は
connect関数のwhile client._connected:以下で,下記の内容.- pythonのHTTPクライアントである
urllib.requestモジュールで,ローカルのWebサーバからデータを取得. http://localhost:8000へGETメソッドでアクセスしている. - コネクションIDを付加してサーバへ送信.
- 上記1,2を2秒おきに繰り返す
- pythonのHTTPクライアントである
- サーバダウンなどの際の
ConnectionTerminatedイベントを検知したときに,クライアント側からも切断するようにしている.これによって,サーバが復帰した際に自動で再度接続できる.- 現状だと再接続を試みて失敗するとそのままなので,定期的に再試行する処理が必要.
Webサーバ用コード概要
フレームワークはFastapiを利用.
GETメソッドのエンドポイントに乱数をjsonのvalueに入れて返す処理を記載.
GitHub - Kosukekim/QUIC-transfer-sample
ContributetoKosukekim/QUIC-transfer-sampledevelopmentbycreatinganaccountonGitHub.
github.com
実行結果
ディレクトリ構成
- src
- api
- main.py
- server.py
- client.py
- api
下記をsrc直下に入って実行
- Webサーバを起動
>uvicorn api.main:app- サーバプロセスを起動
>python ./server.py- クライアントプロセスを起動
>python ./client.py結果
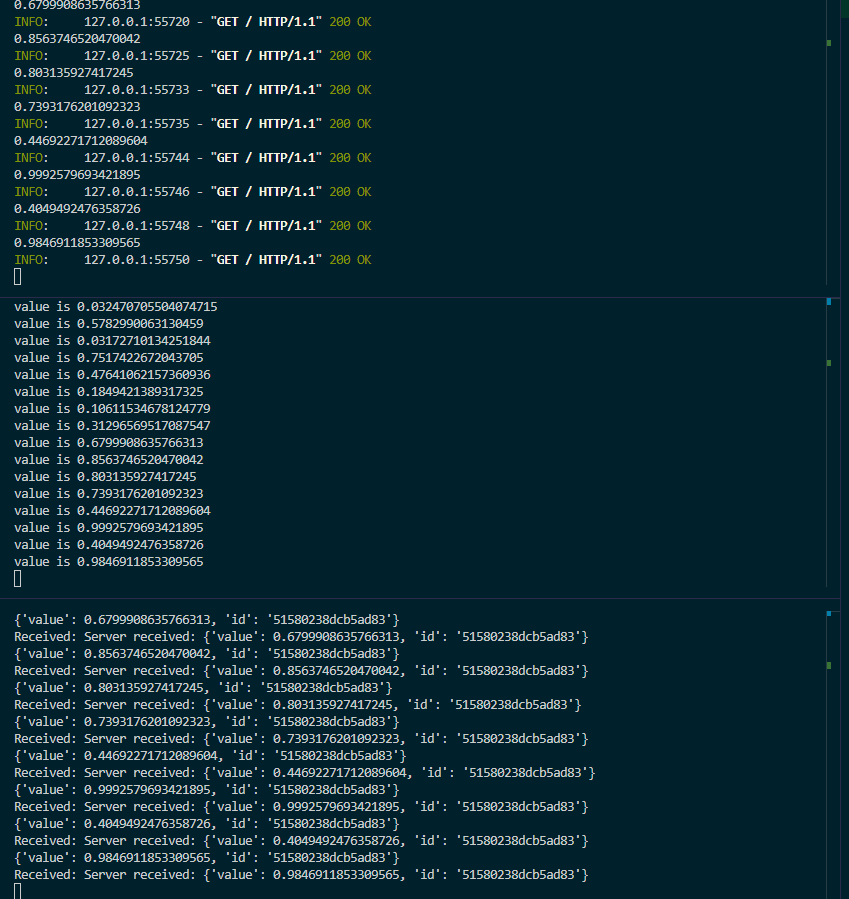
上段のパネル…Webサーバの動作状況
中段のパネル…QUICサーバ(server.py)の動作状況
下段のパネル…QUICクライアント(client.py)の動作状況
QUICクライアントがWebサーバから乱数を受け取り,QUICサーバへ送信.
QUICクライアントは返送された受信メッセージを表示している.
補足
*1.各種処理の部分はstream_handlerを指定してもOK.create_protocolを指定するほうがいろいろできそうだったので今回はそちらを利用した

コメント